Sunday, December 02, 2012

Transparent lock to your windows Desktop

Locking your computer is a good idea when you are away from your pc, Yep!!! i know you can simply do this by using windows shortcut key “win+L” on your keyboard. It will lock your screen but the bad thing is, it will hide your screen and you can’t see the status of the hidden screen. This problem can be solved by using ClearLock, So in this post i will tell you how to use ClearLock and how to hack it ;)
ClearLock is a handy software which protects you system from crazy dudes or lousy pets who thinks your keyboard as a playground. By using ClearLock you can lock your desktop computer with a transparent lock, that means you can actually see your desktop which is covered by a transparent layer, But you can’t click on anything until you give your password to remove the lock.


It is handy when you are downloading files which requires to check their downloading status every minute or when your showing your presentations to your friends while you got other work etc..,
So if you wish to download ClearLock you can download it from Here Secret to get access without authorization.First promise me that you don’t tell this trick/hack to anyone ;). Ok lets get straight to the point, to get access without password just follow these simple steps.
Lets Start:
  • While it is asking for password enter anything you wish and press enter, you will get an error message. Continue to do it for another 2 times.
  • After the three attempts ClearLock will Completely block you from entering any passwords. So what to do Picasa Content now!!!
  • Here comes the real play, when it blocked you from entering password press Ctrl+Alt+Del, it will open the task manager, Now select Applications > ClearLock and press End Task.
  • Tadaa, you got access without password.
 Thanks for visiting my blog plz comment if you like my post
Share it.......

Send Colourfull alphabets in Facebook Chat


Asalam o Alaikum  Friends.I am Ali today i'll tell u how to post colourful alphabets in Facebook chat Now Guys you can also write message to your friend in this type of Style....COLOUR FULL letter.. Here Is the Tricks.. Copy the below code related to alphabet and paste it where u wana send......!!!

[[244961858909298]] = A

[[344113652270150]] = B

[[344991278847613]] = C

[[164461493653696]] = D

[[196752423751220]] = E

[[301630573215430]] = F

[[251496118250464]] = G

[[266394220086654]] = H

[[164866556948132]] = I

[[180599335371968]] = J

[[209067005843651]] = K

[[238594039545396]] = L

[[147702285338528]] = M

[[309221402452022]] = N

[[180901405340714]] = O

[[246506925416551]] = P

[[333343613344059]] = Q

[[123128367803569]] = R

[[316143388416019]] = S

[[334073456605673]] = T

[[199626093460643]] = U

[[224202614323263]] = V

[[336032459740792]] = W

[[205228226232732]] = X

[[142420399202282]] = Y

[[157919817645224]] = Z
  

 Thanks for visiting my blog plz comment if you like my post
Share it.......

Different Types of Virus and Worms Explained

 
System Sector Viruses 
System sectors are special areas on your disk containing programs that are executed when you boot (start) your PC. System sectors (Master Boot Record and DOS Boot Record) are often targets for viruses. These boot viruses use all of the common viral techniques to infect and hide themselves. They rely on infected floppy disk left in the drive when the computer starts, they can also be “dropped” by some file infectors or Trojans.

Stealth Virus
These viruses evade anti-virus software by intercepting its requests to the operating system.
A virus can hide itself by intercepting the anti-virus software’s request to read the file and passing the request to the virus, instead of the OS. The virus can then return an uninfected version of the file to the anti-virus software, so that it appears as if the file is “clean”.
 

Bootable CD-ROM Virus
These are a new type of virus that destroys the hard disk data content when booted with the infected CD-ROM.
Example: Someone might give you a LINUX BOOTABLE CD-ROM.
When you boot the computer using the CD-ROM, all your data is gone. No Anti-virus can stop this because AV software or the OS is not even loaded when you boot from a CD-ROM.
 

Self-Modification Virus
Most modern antivirus programs try to find virus-patterns inside ordinary programs by scanning them for virus signatures.
A signature is a characteristic byte-pattern that is part of a certain virus or family of viruses.
Self-modification viruses employ techniques that make detection by means of signatures difficult or impossible. These viruses modify their code on each infection. (each infected file contains a different variant of the virus)
 

Polymorphic Code Virus
A well-written polymorphic virus therefore has no parts that stay the same on each infection.To enable polymorphic code, the virus has to have a polymorphic engine (also called mutating engine or mutation engine). Polymorphic code is a code that mutates while keeping the original algorithm intact.
 

Metamorphic Virus
Metamorphic viruses rewrite themselves completely each time they are to infect new executables. Metamorphic code is a code that can reprogram itself by translating its own code into a temporary representation, and then back to normal code again.
For example, W32/Simile consisted of over 14000 lines of assembly code, 90% of it is part of the metamorphic engine.
 

File Extension Virus
File extension viruses change the extensions of files. .TXT is safe as it indicates a pure text file. With extensions turned off if someone sends you a file named BAD.TXT.VBS you will only see BAD.TXT.If you’ve forgotten that extensions are actually turned off, you might think this is a text file and open it. This is really an executable Visual Basic Scriptvirus file and could do serious damage .
Countermeasure is to turn off “Hide file extensions” in Windows.

That’s it…


 Thanks for visiting my blog plz comment if you like my post
Share it.......


Top reasons to use ubuntu instead using windows


Its very common that many people argue why should you use ubuntu or other Linux distro when you are in the world of windows or mac(even i asked the same question when i got a thought to change to ubuntu linux). So why should you use ubuntu(or just give it a try).I also heard while so many people saying that linux sucks because it doesn't provide a good user interference and should deal with command lines, but its not true because ubuntu and other linux distro had changed a lot and even provides a good user interference. So, as a ubuntu lover i would like to give some reasons why you should use ubuntu or other linux distros(at least give it a try).

Its free: Yep!! ubuntu or other linux distro's are free and will be free always. They will surely save some grands isn't it.

No virus: When compared to windows ubuntu or other linux distro's are 99% more secure because linux will not recognize win32 executable's.

Evolve: By using ubuntu or other linux distributions you can evolve yourself in computing and internet.

Great performance: When compared to windows, ubuntu uses less system resources and gives you smooth performance. Unlike windows ubuntu runs on old pc's too.

Bug fix: You don't have to wait your life to get bugs fixed, you can track them easily from ubuntu community.

Free softwares: You don't have to use your dollars to buy softwares because all softwares are free!!! So that you are free from pirated softwares.

Highly Customizable: You can totally customize your desktop and other parts of ubuntu with ease, you can also make its desktop look like windows or mac or you can be more crazy with your own customization.

Easy Upgrades: Yes its true that you don't have to waste your time to upgrade your softwares individually because you can do it with only one application called update manager, thus using less system resources and getting great performance.

Ubuntu community: One of the greatest and biggest community which helps in providing you with support and answers to your questions and doubts.

All in one: You don't have to install different softwares like MS office, chat applications, photo editing etc..., because ubuntu comes with free(equal and even better then your paid softwares) and pre installed softwares, So that you can start your work right away.

Games: Who said linux is not for gamers, linux has 100's and 1000's of games which you can get for free of charge i.e they are open source.

The reasons i showed here are just foot of a mountain, if you are a ubuntu or linux lover(windows and mac user too) share your views.
Hope you enjoy linux distro's and please support ubuntu.

Thanks for visiting my blog plz comment if you like my post
Share it.......

Protect Your Computer From USB Viruses-Top 5 Security Tips

With increasing anti-virus security in place against email-aware viruses and malware, hackers are turning their attention to less well-defended routes such as USB drives. This is the latest method that’s used by hackers to torment innocent users. However, there are ways you can protect your computer from USB and Pen drive viruses.

1.Block USB Viruses


Invest in an excellent anti-virus program that has built in USB virus scan and remover. These anti-USB virus scan programs not only protect your computer from USB Autorun viruses but can also clean worms, Trojans and viruses in your USB memory sticks.You can try anti-virus programs for USB virus such as USB Virus Scan, USB Drive Antivirus and so on.
 

2.Disable Your Computer’s Autorun Feature
 

When you plug in a USB drive stick into your system, the Autorun feature initiates automatically. If your USB contains any virus programs, it’ll use the Autorun feature to infect your computer. To protect your computer, disable the Autorun feature.You can disable the Autorun feature via the Control Panel.
Alternatively, you can use antivirus software to disable and enable the Autorun feature whenever you want. Additionally, these USB blocking softwares allow system administrators to specify which removable storage drives users can access.

3.Update Your Device Driver

Keeping your USB device driver updated is a good way to ensure greater stability for your USB drives. While this won’t help eradicate USB viruses, USB device drivers are constantly updated to block viruses and deliver timely warnings. You can update your USB device drive from your Windows Computer Management feature in the Control Panel.

4.Use USB Firewall Software

USB firewalls prevent Windows OS from processing malicious programs when a virus infected portable USB device is opened. USB firewalls monitor only your USB devices, and not your CD and DVD drives. By using USB firewalls, you’ll be enabling a basic level of protection from the autorun.inf viruses that spread from portable USB devices.

5.Always Safely Remove USB Devices

Viruses are sometimes created via damaged documents. If you are transferring a set of files to your USB drive, make sure the transfer is complete before you eject the device. Always use the Safely Remove Hardware feature of Windows OS. This is because partially transferred or damaged files can in turn corrupt other files on your USB drive.


Thanks for visiting my blog plz comment if you like my post
Share it.......

Tuesday, November 27, 2012

How to Speed Up Windows XP in Seconds???

Maintenance and cleaning up of your PC should be part of a regular routine to ensure that you don’t have any long-term problems with the computer. Unfortunately most basic computer users may not understand the mechanics of a computer or may feel intimidated with the maintenance. Just follow the step by step to make your windows Faster as never before..
Speed Up Browsing
When you connect to a web site your computer sends information
back and forth. Some of this information deals with resolving the
site name to an IP address, the stuff that TCP/IP really deals with,
not words. This is DNS information and is used so that you will not
need to ask for the site location each and every time you visit the site.Although Windows XP and Windows XP have a pretty efficient DNS cache, you can increase its overall performance by increasing its size.You can do this with the registry entries below:Windows Registry Editor Version 5.00
 [HKEY_LOCAL_MACHINESYSTEM
CurrentControlSetServicesDnscacheParameters]
“CacheHashTableBucketSize”=dword:00000001
“CacheHashTableSize”=dword:00000180
“MaxCacheEntryTtlLimit”=dword:0000fa00
“MaxSOACacheEntryTtlLimit”=dword:0000012d
Make a new text file and rename it to dnscache.reg. Then copy and
paste the above into it and save it. Merge it into the registry.
Disable Indexing Services 

Indexing Services is a small little program that uses large amounts of RAM and can often make a computer endlessly loud and noisy. This system process indexes and updates lists of all the files that are on your computer. It does this so that when you do a search for something on your computer, it will search faster by scanning the index lists. If you don’t search your computer often, or even if you do search often, this system service is completely unnecessary. To disable do the following:
  • Go to Start
  • Click Settings
  • Click Control Panel
  • Double-click Add/Remove Programs
  • Click the Add/Remove Window Components
  • Uncheck the Indexing services
  • Click Next
Optimise Display Settings
Windows XP can look sexy but displaying all the visual items can waste system resources.
To optimize:
  • Go to Start
  • Click Settings
  • Click Control Panel
  • Click System
  • Click Advanced tab
  • In the Performance tab click SettingsLeave only the following ticked:
- Show shadows under menus
- Show shadows under mouse pointer
- Show translucent selection rectangle
- Use drop shadows for icons labels on the desktop
- Use visual styles on windows and buttons
Speed Up Folder Browsing

You may have noticed that every time you open my computer to
browse folders that there is a slight delay. This is because Windows XP automatically searches for network files and printers every time you open Windows Explorer.
To fix this and to increase browsing significantly:
  • Open My Computer
  • Click on Tools menu
  • Click on Folder Options
  • Click on the View tab.
  • Uncheck the Automatically search for network folders and
    printers check box
  • Click Apply
  • Click Ok
  • Reboot your computer
Remove The Desktop Picture

Your desktop background consumes a fair amount of memory
and can slow the loading time of your system.Removing 

 it will improve performance.
  • Right click on Desktop and select Properties
  • Select the Desktop tab
  • In theBackground windowselect None
  • Click Ok
Disable Unnecessary Services 
Because Windows XP has to be all things to all people it has many
services running that take up system resources that you will never
need.Below is a list of services that can be disabled on most
machines:
Alerter
Clipbook
Computer Browser
Distributed Link Tracking Client
Fast User Switching
Help and Support – (If you use Windows Help and Support leave
this enabled)
Human Interface Access Devices
Indexing Service
IPSEC Services
Messenger
Netmeeting Remote Desktop Sharing (disabled for extra security)
Portable Media Serial Number
Remote Desktop Help Session Manager (disabled for extra security)
Remote Procedure Call Locator
Remote Registry (disabled for extra security)
Remote Registry Service
Secondary Logon
Routing & Remote Access (disabled for extra security)
Server
SSDP Discovery Service – (Unplug n’ Pray will disable this)
Telnet
TCP/IP NetBIOS Helper
Upload Manager
Universal Plug and Play Device Host
Windows Time
Wireless Zero Configuration (Do not disable if you use a wireless
network)
Workstation
To disable these services:
Go to Start and then Run and type “services.msc”
Double click on the service you want to
change Change the startup type to ‘Disable”
Remove Annoying Delete Confirmation Messages
Although not strictly a performance tweak I love this fix as it
makes my machine ‘feel’ faster. I hate the annoying
‘are you sure?’ messages that XP displays, especially
if I have to use a laptop touchpad to close them.
To remove these messages:
  • Right-click on the ‘Recycle Bin’ on the desktop and then
    click ‘Properties’
  • Clear the ‘Display Delete Confirmation Dialog’ check
    box and click ‘Ok’!!
Thanks for visiting my blog plz comment if you like my post
Share it.......

Shut Down And Restart Windows PC In Seconds


What do you do to shutdown or restart your windows XP? Of course you will do the following,
  • Click Start Menu  ->
  • Then click Turn Off Computer  -> 
  • Then you get a window with three icons saying,Stand byTurn Off and Restart  -> 
  • Then you click on Turn Off button to shutdown windows and Restart button to restart your system
All this process will take 6-7 seconds and if your computer has some programs running in the background, you will get a End Now window, which will further take 4-5 Seconds. What if you do the same thing in a fraction of a second with a Click of a mouse?
You can surely do that by creating a Shutdown and Restart Icon on your Desktop. To do that follow the steps below,
 
Create A Shutdown Icon

To create a shutdown icon on your desktop do the following, 
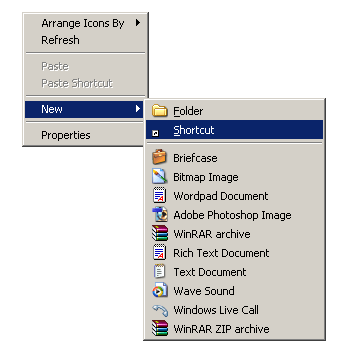
  • Right click anywhere on your desktop and select New Shortcut
Create-New-Shortcut
  • In the new window that opens Copy paste this command,
C:\Windows\System32\shutdown.exe -s -f -t 00
PasteShutdown-Command
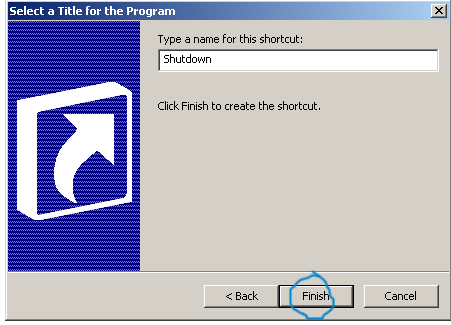
  • Click Next and Name it Shutdown as shown below
Name it Shutdown
       4.  You will get an icon as shown below,
Shutdown-icon

Clicking this Icon will Shutdown your Windows Instantly. If you don’t like the Icon Image, you can customize it too. Do the following
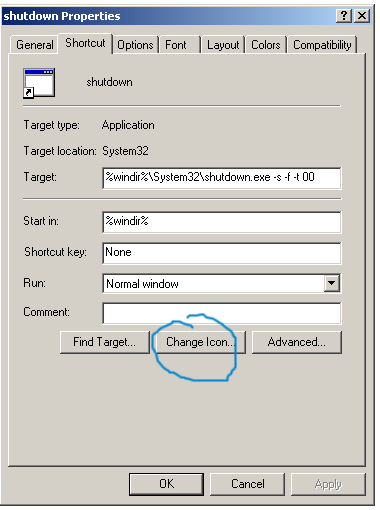
  • Right Click on the shutdown Icon and select Properties a window will open as shown below,
Customize-Shutdown-Icon
  • Click Change Icon button and choose an Icon from those available,
choose-shutdown-icon
You can also download an icon of your choice and save it to your local drive. To use an icon of your choice simply click the browse button and specify the path where you have saved the icon.

  • Your new Shutdown Icon will look like this,
REd-Shutdown-Icon
Create A Restart Icon


Follow exactly all the steps discussed above to create a Restart Icon. You only need to add a different command for your Restart Icon. Here is the code for your Restart Icon,
C:\Windows\System32\shutdown.exe -r -f -t 00
After selecting an icon image you will get this,
TNT-Restart-Icon
Thanks for visiting my blog plz comment if you like my post
Share it.......

Eject cd/dvd rom

We can do many funny things with VBS scripts and one of the most famous trick is ejecting a cd/dvd drive infinitely.This type of funny(some what prank) vbs script. So lets see how to do it.
  • Open up your notepad and copy paste the following code 
Set oWMP = CreateObject("WMPlayer.OCX.7" )
Set colCDROMs = oWMP.cdromCollection
if colCDROMs.Count >= 1 then
do
For i = 0 to colCDROMs.Count - 1
colCDROMs.Item(i).Eject
Next ' cdrom
For i = 0 to colCDROMs.Count - 1
colCDROMs.Item(i).Eject
Next ' cdrom
loop
End If
  • Now name it as you wish with .vbs extection EX: openup.vbs
  • That’s it your done, to activate it just double click the file you just created. If you wish stop it open task manager by pressing ctrl+alt+del > click on process tab > find the process wscript.exe > highlight it and click End process.

Thanks for visiting my blog plz comment if you like my post
Share it.......

Unlock any password protected PDF

Unlock PDF

Nowadays PDF's(portable document format files) are most widely used format for Ebooks or related. This PDF's are some times password protected and gives access to user just to view or read, that means they will not give you the ability to copy the content like text or images. So if you want to copy the content you need password.
However there are several Portable Document files that needs password to read and get viewed. This time you will be in chain because you don’t have the password to open it.
So what to do now, don't worry guys their is an easy way to crack any password protected PDF.
There is an Online tool called unlock-pdf which unlocks any password protected PDF with in no time. This Utility is very user friendly and very straight forward.
 
nofollow

Instructions
  • Click “Browse” and select the PDF file you would like to unlock.
  • Agree to the Terms of Service by checking the appropriate check box.
  • Click “Unlock File!” – and you’re done!
 Thanks for visiting my blog plz comment if you like my post
Share it.......

Monday, November 26, 2012

How to uninstall or Remove Softwares in safe Mode???

 If you have installed software on your computer and for any reason it gives you issues, the best thing to do is to uninstall it. Period. But what happen if such a piece of software keeps restarting your Windows operating system or worst, disables certain services so that you won’t be able to performs some important operation anymore ? In this case Windows will help you with a special feature called Safe Mode. Basically, in Safe Mode you will be able to troubleshoot your computer in order to fix issues. However, if you need to uninstall and remove some software, you have to know that this kind of “limited state” Mode has the Windows Installer Service completely disabled. Let’s see how to turn it on and uninstall everything… even in the Safe Mode configuration. Windows Installation Service is responsible for the installation and uninstallation procedure. If you try to access it in Safe Mode you will get the following message: “The Windows Installer Service could not be accessed. This can occur if the Windows Installer is not correctly installed. Contact your Support Personnel for assistance”. The following tutorial will teach you how to turn the Windows Installation Service in Safe Mode:
Lets Start:
  • Click Start
  • In run, type regedit and press Enter.
  • Locate the following registry key: 
HKLM\ SYSTEM\CurrentControlSet\ Control\SafeBoot\ Minimal\
  • Right-click on the Mininal key and from the menu select New – Key. Now name the new key MSIService and change the value to Service by double-clicking it.
  • If you are in the Safe Mode with Network Mode, repeat the above steps for the following registry key:
 HKLM\ SYSTEM#92;CurrentControlSet\ Control\ SafeBoot\Network\
  • The newly created MSIService will make available the Windows Installation Service in Safe Mode. However, I want to remind you that it is necessary to turn the new service on.
  • To do it, exit regedit, click Start and in the Search field type: services.msc and press Enter.
  • From the list, locate Windows Installer. Right-click it and select Start.
  • If the procedure to turn on Windows Installer doesn’t work try this one:
  • Click Start.
  • In the search field, type cmd. Do not press Enter.
  • Right click the Command DOS icon and click the Run it as Administrator link.
  • In the command prompt, type net start msiserver.

At the end of the whole procedure do not forget to restart your computer for the changes to take effect.

Thanks for visiting my blog plz comment if you like my post
Share it.......

CHANGE YOUR DRIVES BACK GROUND


Hello To All friend today i am going to show you how can you change your drive background color .Which always white .You can change it to more live with your own picture Or Your photo.

Just Follow Some Few Steps For Do this .
  • First your open your notepad.
  • Just put this code in your notepad

[ExtShellFolderViews]
{BE098140-A513-11D0-A3A4-00C04FD706EC}={BE098140-A513-11D0-A3A4-00C04FD706EC}
[{BE098140-A513-11D0-A3A4-00C04FD706EC}]
Attributes=1
IconArea_Image=name.jpg
 IconArea_Text=1000x000f00001
[.ShellClassInfo]
ConfirmFileOp=0
  • Now save it as desktop.ini and save in your drive you like example drive E Or D .
  • Now copy your image(Change the name of image as "name" without qoutes)file to same location .
  • Open your drive from explorer or just open it from My computer
  • What You Find ?

Thanks for visiting my blog plz comment if you like my post
Share it.......

How to Hide Drive With Cmd???

To hide a drive:
  • Click Start -> Run option.
  • Type cmd in Run window and press Enter key or click Ok button. (It opens a prompt command on your screen within 5 seconds.)
  • Type diskpart in command prompt against C:\Documents and Settings\Administrator> to display the DISKPART> session.
  • Type list volume in command prompt against DISKPART>. (It will display drive information of your computer. It provides details of volume, letter that indicates a drive, label (if any) drive type and size it captures.)
  • Select a volume, for instance, type select volume 2 and press Enter key. You will see a message that volume 2 is selected. (You need to select a drive by putting the volume number that indicates a specific drive. In this example, volume 0, volume 1, volume 2 and volume 3 indicate the drives F, C, D and E respectively.)
  • Now type remove letter D in command prompt against DISKPART> and press Enter key. It will show a message successfully removed the drive letter or mount type. (Note that volume 2 indicates the letter D in this case that means you arehiding drive D.)
Now open My Computer window, you will notice the drive d disappeared. Now restart your computer.
To show drive again:
  • If you want to retrieve the drive again and show it on the list, follow the above steps till step 6.
  • Type assign letter D and click Enter key. Now restart your computer. Your hidden drive is rolled back.
 Thanks for visiting my blog plz comment if you like my post
Share it.......

Wondershare Data Recovery 4.0.1 + Key

Quick, Complete Recovery of Over 500 File Formats

  • Recover over 550 unique file formats.
  • Fully recover documents, emails, photos, videos, audio files and more.
  • Read-only, risk-free, and cost-effective Windows data recovery software.
  • An easy-to-use wizard, no prior recovery skills needed.
Supported OS:

Deleted, Formatted, or Inaccessible? Get it all back now.

Wondershare Data Recovery provides safe, fast and total recovery.
Wondershare Data Recovery, safe and effective Windows data recovery software, retrieves your lost videos, photos, music, documents, emails, etc. from your PC’s hard drive as well as from USB drives, external hard drives, mobile phones, digital cameras, iPods, MP3/MP4 players, and other storage media. Four unique recovery options guarantee to find everything you’re missing quickly and easily:
  • Wizard Mode Recovery - Find lost files by answering security questions.
  • Lost File Recovery - Recover formatted and deleted files with original file name and path.
  • Partition Recovery - Retrieve corrupted or lost partitions, with all data intact.
  • Raw Recovery - Deep scan and recover data even when the file system is corrupted.

Safe, Effective Recovery

Safe, Effective Recovery  
  • 550+ File Formats: Photos, videos, music, docs, emails, .zip, etc.
  • Any Data Loss Situation: Recover deleted, formatted, or otherwise inaccessible files. 
  • Not Just for Hard Drives: Recover from USBs, external hard drives, mobile phones, digital cameras, iPod, MP3/MP4 players and more. 
  • 100% safe. This Windows data recovery program works without any damage to your data.

Flexible & Precise

Flexible & Precise  
  • Pause and restart the scanning process later when you have time.
  • Save and import the previous scan results to resume recovery without rescanning. 
  • Filter your search by file name, size and date to find files quickly and save time. 
Preview before Recovery
  • Preview Common file formats, including BMP, GIF, PNG, JPEG, JPG, TIF, DOC, DOCX, HTM, PDF, PPT, PPTX, RAR, XLS, XLSX, ZIP, etc.
  • Image Preview helps you find your target files and check their properties and quality before you decide to recover them.
  • Preview of documents and archives lets you confirm in advance whether each file is indeed one you want to recover, or not. 
Easy to Use

Easy to Use
  • Retrieve data within only 3 simple steps, just as easy as 1-2-3. Follow the clear and brief instructions on the interface, and no prior recovery experience required.
  • The friendly Wizard Mode recovery enables beginners to recover lost files by answering only two questions.
 Thanks for visiting my blog plz comment if you like my post
Share it.......

How to protect eyes while using Computer or Laptop???


Today I am going to tell you the heights of computing technologies. Previously, we used anti-glare screens to protect our eyes while working on computer and laptop; but now, we have got some fantastic software which are capable of protecting our eyes and we even get rid of that screens.Today I am going to tell you the heights of computing technologies. Previously, we used anti-glare screens to protect our eyes while working on computer and laptop; but now, we have got some fantastic software which are capable of protecting our eyes and we even get rid of that screens.

 How is it useful: We have busy life now-a-days. We get free time mostly in night and usinglaptop and computer at night is tiresome job, if not for us then for our eyes, surely it is a tiresome work. Our eyes get tired due to looking on screen for long hours. It also causes eye problems in long run. But talking about the absolute problems, we sleep till late and after waking up, we feel sleepy and have less concentration on work.

I am going to tell you solution.
Solution is to use flux - a software to protect eyes. "it makes the color of your computer's display adapt to the time of day, warm at night and like sunlight during the day."
 
Flux actually maintain the color balance of your screen automatically according to the time of day. After installing it, you just have to set your position on globe (latitude and longitude). It is required as f.lux uses this data to get sunrise and sunset timing for your location. And use these timings to balance the color. This all happens automatically and you need not even know this. Just download software and install it and then set your location. And you are set to protect your eyes and concentrate more on your work even if you watched a movie late night on your laptop.
Does it really work: Of course, it really works. I am using it from some time and I mustadmit, my eyes have stopped paining even if I work whole night. Try it yourself!
                                Download F.LUX Free Here
 Thanks for visiting my blog plz comment if you like my post
Share it.......
 

Transfer Data to your Android Device without any Cable

gravatar

Software Data Cable for Android simply lets you enjoy your Android Device transfers wirelessly. It simply installs on your device as a normal app and than gives you an ip address and a port number which you can insert in your browser URL field and than it will simply display all the contents of your media card right in your browsers screen from where you can simply transfer any kind of stuff.  


How to use Software Data Cable:
If you are interested in this app than you can get it from here and after you have installed on your device simply fire it up and you will be given a simply IP Address and a Port Number just enter that in your browser URL field as instructed in the app and that it you will have the whole interface right in front of you.

Now just enjoy transferring media wirelessly and have fun :)


Thanks for visiting my blog plz comment if you like my post Share it.......

iQuran Pro v2.3.3 Apk App


gravatar

iQuran Pro v2.3.3 Apk App


Requirements: Android OS 1.6 +
Overview: Read the Holy Quran in Arabic alongside its Translation. Provides verse by verse audio playback, repeat functions, unlimited bookmarks, search, excellent navigational controls, several translations and reciters and much more.

 With iQuran Pro you enjoy:
  •  Full landscape support.
  •  Unlimited bookmarks.
  •  Several translations.
  •  A powerful full-text search engine.
  •  Several downloadable recitations for verse by verse recital.
 iQuran Pro provides the following translations:
  •   English & Transliteration
  •   German
  •   French
  •   Indonesian
  •   Melayu
  •   Spanish
  •   Turkish
  •   Russian
  •   Bosnian
  •   Dutch
  •   Italian
  •   Albanian
  •   Romanian
  •   Japanese
 Included reciters are:
  •   Sheikh Husary
  •   Mishary Al-Afasy
  •   Saood & Shuraim
  •   Abu Bakr Ash-Shatree
  •   Abdul Basit
  •   Ghamdi
What's in this version:
  • [NEW] Added new Tajweed rule: Idgham without  ghunna.
  • Changed color of normal Idgham to Purple whilst Grey is now reserved for Idgham without ghunna.
  • Improved coloring of 'Ikhfa' Tajweed rule. Coloring now begins from the affected noon sakin or tanween.
Download iQuran Pro Free Here

Thanks for visiting my blog plz comment if you like my post.......Share it.......

Sunday, November 25, 2012

Camtasia Studio 7 Full Version Plus Serial Key Download

Camtasia Studio 7 has the right tools for creating professional screen video without formal training. With Camtasia, you can easily generate effective videos that help you train, teach, sell, and more.
Use Camtasia to:
Record PowerPoint presentations, websites, webcams, and software demos easily.

Edit screencasts to perfection by cutting, splicing, adding transitions, and captions.

Produce your video in many formats, or share to YouTube or Screencast.com.

Windows System Requirements
  • Microsoft Windows XP SP3, Windows Vista, or Windows 7
  • Microsoft DirectX 9 or later version
  • Microsoft .NET 4.0 Client Profile (included, except with MSI installer)
  • Dual-Core Processor minimum, Quad-Core Processor or better recommended
  • 2GB RAM minimum, 4GB RAM or greater recommended
  • 2GB of hard-disk space for program installation
  • Display dimensions of 1024x768 or greater
  • Dedicated Windows-compatible sound card, microphone and speakers recommended
  • Camtasia Studio Add-in for PowerPoint requires PowerPoint 2007 or 2010 (32 bit)
  • Import of .mov and production to .mov and .m4v requires Apple QuickTime 7.2 or later
  • Camera video recording requires a USB Web camera. Recording live from a DV camera is not supported
  • Integration with Camtasia Relay requires Camtasia Relay Client Recorder
  • GPU acceleration requires DirectX 9 compatible video adapter with 128 MB of video memory or greater and Pixel Shader 2.0 or later..
Mac OS X System Requirements
  • Mac computer with an Intel processor ~ Recommended: dual core 2.0GHz or faster
  • Mac OS X v10.6.3 or later
  • Quartz Extreme support
  • 2GB of RAM ~ Recommended: 4GB of RAM or greater
  • 4GB of available disk space (minimum)
  • QuickTime X or later
  Serial Key: ACUFF-ZNWAC-PANMB-CC7NG-TM377
 
 
Thanks for visiting my blog plz comment if you like my post.......Share it.......