Sunday, February 10, 2013

How to disable command prompt (cmd) in PC

Friends,  in this tutorial I will tell u that how can you make your computer more secure???Sometimes, ur friends or other relatives harm ur system through the command prompt.
Follow my instructions:
  • Go to Start.
  • Click run.
  • Type regedit in Run and hit enter.
disable command prompt
  • Now Browse as
  • Local Computer Policy >> User configuration >> Administrative >>Templates >> System
  • Now You will see an item named Prevent access to the command prompt
disable command prompt

  • Double click on this item. This will open a pop up window.
  • Select Enabled tab from this window to disable command prompt on your windows based computer.
  • Restart your computer.

Disable Autoplay of Audio CDs , Blank CD or DVD media and USB Drives in XP and Vista

Disable Autoplay
Feel bad when autoplay notification tease again and again here is simple trick to disable it (For XP)
Steps :
  • To get to the configuration screen for this setting, go to Start Menu \ Run and type in:
 gpedit.msc
  • You will see the Group Policy window. You should select Administrative Templates \ System in the tree view:
Disable Autoplay of Audio CDs , Blank CD or DVD media and USB Drives in XP and Vista
  • You will see an item in the right side pane called “Turn off Autoplay”
Disable Autoplay of Audio CDs , Blank CD or DVD media and USB Drives in XP and Vista
  • Double click the item, and set the radio button to Enabled, and change the “Turn off Autoplay on” to All Drives.
Disable Autoplay of Audio CDs , Blank CD or DVD media and USB Drives in XP and Vista
  • Now you should be safe from the autoplay monster.
Disable AutoPlay in Windows Vista
Windows Vista’s AutoPlay options are a great improvement over Windows XP in terms of flexibility, but unfortunately there are so many options that it can be confusing, especially since there’s no specific mention of USB Flash drives in the options.
  • Open your Control Panel, and then click on “Play CDs or other media automatically” to open the AutoPlay dialog.
Disable Autoplay of Audio CDs , Blank CD or DVD media and USB Drives in XP and Vista
Disable AutoPlay Globally
  • The quickest way to disable AutoPlay entirely is to just uncheck the box for “Use AutoPlay for all media and devices”, which should usually work.
Disable for a Single Type
  • You can choose a setting in the drop-down menu for a single type of drive, for instance Audio CD in this example. For this to work you’ll have to make sure to keep the global autoplay option on, and then choose the specific setting in the drop-down.
Disable Autoplay of Audio CDs , Blank CD or DVD media and USB Drives in XP and Vista
Disable for just Removable (flash) Drives
  • The problem here is that while there are settings for Audio CDs and DVDs, there’s nothing specifically for USB flash drives. Windows will determine the drive type based on the content it finds on the flash drive itself, so that’s what we’ll need to change.
  • In order to disable AutoPlay for the removable drives, you should change all of the following to Take no action: Software and games, Pictures, Video files, Audio files, and Mixed content.
Disable Autoplay of Audio CDs , Blank CD or DVD media and USB Drives in XP and Vista
Disable Through Group Policy
  • A number of readers have written in complaining that the option to disable autoplay isn’t working for them, so if you’d like to disable it entirely you can use the Group Policy editor on the Business and Ultimate versions of Vista.
  • Open up gpedit.msc through the start menu search box, browse to Windows Components \ AutoPlay Policies, and change the value of “Turn off Autoplay” to enabled.
Disable Autoplay of Audio CDs , Blank CD or DVD media and USB Drives in XP and Vista
  •  You can choose whether to disable for just removable devices, or entirely. I’m not sure if that makes any sense, however.
Disable with Registry Hack
The Group Policy editor is not available on Windows Vista Home editions, so I’ve also included the registry tweak to disable AutoPlay entirely.
Download and unzip this registry hack and then double-click on the appropriate file.
  • DisableAutoPlay.reg will disable autoplay entirely.
  • DisableAutoPlayRemovable.reg will disable autoplay on removable devices.
Disable AutoPlay of Blank CD or DVD media
  • Ubuntu will automatically launch a CD burning tool when you insert a blank data cd or dvd. This can sometimes interfere with something else you are doing right at that moment.
  • To disable this, navigate to System \ Preferences \ Removable Drives and Media:
Disable Autoplay of Audio CDs , Blank CD or DVD media and USB Drives in XP and Vista
  • Uncheck the box, and you will no longer autoplay blank discs.

Saturday, February 09, 2013

How to get rid Computer Slowdowns And Hangs

Computer Slowdowns And Hangs
There are many reasons for slowdowns and hangs of your computer. For this you have to try out several solutions and the actual cause to it. There are some basic steps that you should perform in case of slowdowns and hangs. Moreover you don't require any external software.
Follow me:
Free up memory on your hard drive if your computer is performing slower than usual. A hard drive that is near capacity can cause the computer to significantly slow down. Delete any files you no longer use. You also can use the "Disk Cleanup" utility built into your computer. To launch this utility
  • Click  Start
  • All Programs
  • Accessories
  • System Tools
  • Disk Cleanup
  • A list of files is presented in a dialog box.
  • Click the check box next the files you want to delete and then click the "OK" button at the bottom of the dialog box to activate the utility.
Application Observe your computer and pinpoint a program or combination of programs that are running when it freezes. There might be a specific program responsible for freezing or crashing your computer. Try terminating that specific program and seeing if that fixes the problem. To terminate a program, press (CTRL+ALT+DEL) on your keyboard. This shortcut opens a window listing the currently running programs on your computer. Choose a program and click the "End Process" button to terminate the program.
Defragment your computer's files. Fragmented files occur when parts of a single file are stored in multiple places on the hard drive. This causes a computer to perform slowly because the computer must search in multiple places when accessing a fragmented file.
  • To defragment your computer click Start
  • All Programs
  • Accessories
  • System Tools
  • Disk Defragmenter.
Scan your computer for malicious files. Viruses or spyware often cause your computer to slow down or freeze. Use the virus scanner that is installed on your computer. If you don't have a virus scanner installed on your computer, there are online virus scanners available. After you have completed a virus scan, your results are displayed. The most desirable option is to delete any viruses or spyware that was found on your computer. Follow the virus scanner's prompts to delete the virus. However, not all viruses can simply be deleted. In this case, choose the "Quarantine" option in the virus scanner. This places the file in a separate folder or location on the drive where it can't affect other files
Repair any disk errors. Disk errors can cause your computer to slow down and freeze. You can use a utility on your computer to detect and fix disk errors. To do this, first open "My Computer." Right-click on the hard drive you want to repair and click "Properties." Click the "Tools" tab and then click the "Check Now" button. Select the check box next to "Scan for and attempt recovery of bad sectors." Then click the "Start" button and the utility detects and repairs bad sectors.
Reboot your computer if your computer freezes. Hold down the "Power" button on the computer for at least five seconds. Wait for the computer to shut down and restart the computer. This is usually a temporary fix, but will at least unfreeze your computer

Additional Precautions :
Back up the data on your computer if your computer is slow or freezing often. To back up data, plug in an external hard drive or insert a CD or DVD and copy important files onto the storage device. You can simply drag the files from your computer into the storage device's folder. You also can use the Windows backup and restore utility. Open the backup and restore utility in Windows from the "Control Panel" and follow the prompts to create an entire clone of your hard drive.
Try not to reboot your computer by holding down the "Power" button too often as this can destabilize the operating system

Find Your Missing USB Drive in Windows XP

usb mising recover

Have you ever plugged in a USB drive or any external device with a hard drive and wondered why you cannot see it in My Computer?More than likely the cause is that Windows renamed the drive to a letter that is already in use. This will happen if you have several card readers, thumb drives or external hard drives attached. It will also happen if you are on a network and have mapped drives.To find the drive and then rename it, you’ll want to right-click on My Computer and select Manage.

Missing USB Drive
  • From the Computer Management screen, select Disk Management.
Missing USB Drive
  • In this window you should see all of your connected physical drives, their format, if they are healthy, and the drive letter.
Missing USB Drive
  • In this instance I am going to change the drive letter of my Lexar USB drive. Right-click on the drive in the list, and from the resulting menu select “Change Drive Letters and Paths…”
Missing USB Drive
  • Click on Change so we can change the drive letter. You might notice that you can select Add, which would let you mount the drive into a folder if you wanted to. We don’t want to, so just click Change.
Missing USB Drive
  • Select a new drive letter from the drop down list, preferably the one that you usually use for this drive.
Missing USB Drive
  • Click Yes on the confirmation screen and you are done
Missing USB Drive
  • If you have auto play enabled, you will get the normal pop up dialog asking what you want to do.
Missing USB Drive

Create a system restore point in Windows 8/7

restore point in Windows 8/
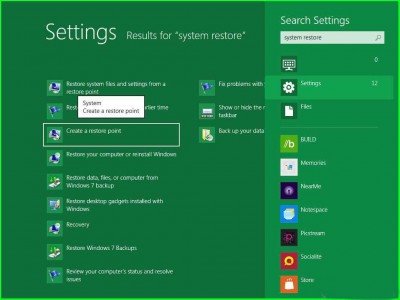
Assalam o ALAikum! Today i will tell you how to create a restore point in Windows 7 & 8.It will record your every setting like windows registry .If unfortunatly something went wrong in your computer u can restore it.It is very easy to create a restore point in win 7 & 8.
Steps:
  • Click the Start button and in the search field type "Create a restore point" and click the appropriate command.
restore point in Windows 8/
  • In the next window, click Create.
  • Enter a name to identify the restore point of Windows 8/ (and avoid confusion when restoring) and click Create.
  • Now it only remains to wait for the process of creating a restore point finish.

Download Youtube Video's On Pc or Mobile without Software


Today we will see how to download youtube video's on you pc and mobile without 3rd party software, very easy. you just need to follow the easy steps and you are done.
Follow this Very simple steps:
  • Go to YouTube, Open the video that you want to download
  • Now you have to make a small change in video link ( Replace "www" to "ss")
  • For example http://www.youtube.com/video link(i.e  http://ssyoutube.com/video link )
  • After it will redirect to a new site http://en.savefrom.net/
  • Now you have to choose the format of the video like mp4,3gp,flv and also shows the video quality like 240p,360p,720p,1080p 

Friday, February 08, 2013

How to screenshot in Computers???

How to screenshot in Computers
Assalam o Alaikum! Friends today am posting how to take screenshot on both Windows & Mac OS.
How to Take Screenshot in Windows.
There are couple of ways to capture a screen in Windows.
So,the easiest of them is what we will be going through here.
  • The first is by using the default screen-capture key on every computer(i.e The PrtScn) on your keyboard.
  • Locate it & let's start.
  • To take the shot of everything currently displaying on the screen including all open windows,press PrtScn.
  • This will be automatically placed in the Clipboard.
  • To capture just the active window,press Alt+PrtScn.
  • Now to save the shots,open Microsoft paint by navigating to Start » Programs » Accessories » Paint and paste it there.
  • Next select File from the top menu and choose “Save as
  • Give it any name you want and choose a directory to save the image.
  • The second method involves using the “SPINNING TOOL”.This tool is by default part of  winidws8/7  & Windows vista.
  • It is capable of capturing a specified area of a page instead of the whole screen as with the previous method.
  • You can choose to use an amoeba-like[irregular] shape,a rectangle or capture the whole screen.
    How To Use “SNIPPING TOOL”.
  • Go to start » All Programs » Accessories » Snipping Tool.
  • Select a snipping type by clicking on the arrow next to “New” button.
  • Select the window or portion of the screen you want to capture using your mouse.
  • To highlight part of the screenshot,click on the pen/highlighter button in the menu.
  • Likewise,to capture a menu/drop-down menu,press ESC after you've launched the Snipping tool,then open the menu you want to capture & press Ctrl + PrtScn.
These are for windows

How To Take Screenshot on Mac OS X.
Mac OS has an in-built screen-grabbing function,which enables you to take shots by clicking on some key combinations.When these keys are pressed,a click sound will be heard,then the screen-shot will immediately be saved in .PNG format.
  • To capture the whole screen,press Cmd + Shift + 3 all at once.
  • To capture just a portion of the screen,press Cmd + Shift + 4.
  • Just drag the crosshair that appears around the area to be captured.
  • To capture a specific window,press Cmd + Shift + 4 and immediately after that,hit the Spacebar.
  • The crosshair will then turn into a small camera,highlighting all menus that can be captured.

How to Fix windows xp corrupted file easily???

Fix windows xp corrupt
Manny time some xp files get currupted, So Today i will show you how to easily fix Windows xp corrupted files. Its work perfectly on windows xp and might works on windows 7 and windows vista also. Just follow below instruction to fix your corrupted window.
Requirements:-
• PC Running Windows xp
• Windows XP CD
Steps to do this:-
• Place Windows XP cd in your CD/DVD drive.
• Then Go to Start > Run
• Type in sfc /scannow

Fix windows xp corrupt
• Now your XP will run fine.

How to Format unformatable USB using CMD???

Format unformatable USB
Hey Friends today we will see how to format usb flash drive using MS-DOS.manny times we need to format our usb drives, people find it difficult so today reading this article you will be able to format you usb very easily,lets see the steps.
  • Click Start > Run... and type cmd in the box then Click OK
Format unformatable USB
  • The command prompt window appears.
  • Type the following command : format F:  (Replace "F" with the letter of your USB Flash Drive) And hit enter.
Format unformatable USB
  • You can also use "diskpart" to list all drive letters.
  • If you want to format it as FAT32 then type:
  • format F: /FS:FAT32
  • After typing one of the above commands, press Enter
  • When it asks for pressing Enter again, just press it to confirm.
  • It will prompt you to enter a name for the drive, write it and hit Enter

Monday, February 04, 2013

4 Ways to Boost Your Booting Time

Slow booting is a major problem for majority of us.we have to wait for a long time to start our computer, but not worry friends because in this article i will provide you ways to boost you booting time. faster boot up seems to be an elusive goal for most of the people. we ourself can decrease the time it takes to start up our computer in windows with just few tweaks..lets see how it can be done.
Step 1: Hard Disk Check Up
Over time, your hard drives gets degraded both physically and digitally. It’s important to monitor your drives health. An error or damaged sector can throw software loading into an infinite loop causing long load times. To check your drive health:
  • Click Start
  • Choose Computer
  • Right Click your Hard Drive
  • Choose Properties
  • Click Check Drives Health. After, the check up gives you repair options or a clean bill of health.
  • Restart to get a faster boot up.
Step 2: Eliminate Startup Delay
To get faster boot up speeds, you can cut the boot delay to 0. The delay is in place to allow your startup processes some breathing room during loading. Your default delay is 30 seconds. So, you can eliminate it for faster boot up times.
  • Open your Start menu.
  • Click Run
  • In the command screen, type msconfig
  • In the system configuration utility, click either BOOT tab.
  • In the boot menu, change the default setting for the Time Out from 30 to 5 seconds.
Step 3: Organize your Hard Drive
If you are looking for something in a messy room, naturally, it’s going to take you longer to find something. This is a good metaphor for a hard drive. Over time, filing system gets disorganized. Periodically, you need to reorganize this filing system on your hard drive. Luckily, Windows has a good utility called Defrag that will put your system in order.
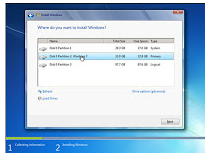
  • Open the Start Menu
  • Click on My Computer
  • Right Click your C: drive or your hard drive image.
  • Scroll down to the Click Properties
  • In the Properties Menus, Open the “Tools” menu.
  • Choose Defragment.
  • In the Disk Deframenter menu. Click on Defragment
Step 4: Remove Excess Startup Programs
Most programs you add to your computer will opt to load when you startup your computer. Eventually you will rack up a load of programs that kill faster boot times. You need to reduce the startup programs. You can easily disable unnecessary startup programs. Here is how:
  • Open your Start menu.
  • Click Run
  • Type msconfig, click Enter
  • In the system configuration utility,click either services or startup tab.
  • Uncheck all programs that your are no longer want to run in the background.
  • Click OK

Resize a Partition for Free in Windows 7 or Vista

Resize a Partition for Free in Windows 7 or Vista
Windows 7 and Vista include a built-in functionality in Disk Management to shrink and expand partitions. No more 3rd party utilities needed!To get to this utility, open up Control Panel, and type in partition into the search box.. you’ll immediately see the link show up:
Resize a Partition for Free in Windows 7 or Vista
Shrink a Partition
  • In the Disk Management screen, just right-click on the partition that you want to shrink, and select “Shrink Volume” from the menu.
Resize a Partition for Free in Windows 7 or Vista
  • In the Shrink dialog, you will want to enter the amount you want to shrink by, not the new size. For example, if you want to shrink your 50gb partition by roughly 10gb so that it will now be roughly 40gb, enter 10000 into the box:
Resize a Partition for Free in Windows 7 or Vista
Extend a Partition
  • In the Disk Management screen, just right-click on the partition that you want to shrink, and select “Extend Volume” from the menu.
Resize a Partition for Free in Windows 7 or Vista
  • On this screen, you can specify the amount that you want to increase the partition by. In this case, I’m going to extend it back to the roughly 50GB size that it was before.
Note that the extend partition feature only works with contiguous space.

How to Set a Video as Your Desktop Wallpaper with VLC???

Set a Video as Your Desktop Wallpaper
Assalam o Alaikum! Friends you hav tried simple(static) desktop wallpapers here i brought a bit fun for you.You can set video as desktop wallpaper for this we’ll take a look at setting a video as wallpaper in VLC media player.
  • Download and install VLC player. You’ll find the download link below. Open VLC and select Tools > Preferences.
Set a Video as Your Desktop Wallpaper
  • On the Preferences windows, select the Video button on the left.
Set a Video as Your Desktop Wallpaper
  •  Under Video Settings, select DirectX video output from the Output dropdown list.
Set a Video as Your Desktop Wallpaper
  •  Click Save before exiting and then restart VLC.
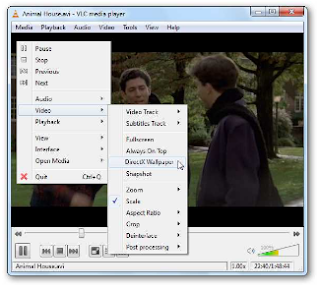
  •  Next, select a video and begin playing it with VLC. Right-click on the screen, select Video, then DirectX Wallpaper.
Set a Video as Your Desktop Wallpaper
  •  You can achieve the same result by selecting Video from the Menu and clicking DirectX Wallpaper.
Set a Video as Your Desktop Wallpaper
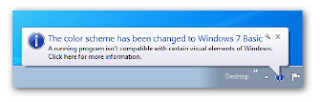
  •  If you’re using Windows Aero Themes, you may get the warning message below and your theme will switch automatically to a basic theme.
Set a Video as Your Desktop Wallpaper
  • After the Wallpaper is enabled, minimize VLC player and enjoy the show as you work.   
  • When you are ready to switch back to your normal wallpaper, click Video, and then close out of VLC.
Set a Video as Your Desktop Wallpaper
  • Occasionally we had to manually change our wallpaper back to normal. You can do that by right clicking on the desktop and selecting your theme.
Set a Video as Your Desktop Wallpaper

Hack administrator password using guest account

Hack administrator password
If you been using someones Pc in guest account and want to have Admin privilage then worry not,there is a trick for you to Gain Admin Privilage .
Method 1.
  • Go to C:/windows/system32.
  • Copy cmd.exe and paste it on desktop.
  • Rename cmd.exe to sethc.exe.
  • Copy the new sethc.exe to system 32,when windows asks for overwriting the file,then click yes.
  • Now Log out from your guest account and at the user select window,press shift key 5 times.
  • Instead of Sticky Key confirmation dialog,command prompt with full administrator privileges will open.
  • Now type “ NET USER ADMINISTRATOR "zzz" where “zzz" can be any password you like and press enter.
  • You will see “ The Command completed successfully" and then exit the command prompt and login into administrator with your new password.
  • Now You have hacked admin through guest account.
Method 2
This is another method you can use to hack admin password without knowing it.
It is possible to change Adminstrator password both in Win XP and Vista without knowing it. If you some how manage to login as an Administrator then you can change the password without knowing it.
Here’s the Step-By-Step instructions.
  • Right-click on the “My Computer” icon on the desktop OR in the Start Menu.
  • Select the option “Manage”.
  • On the left pane expand the “Computer Management (Local) tree (if it is not already expanded)
  • Double click “Local Users and Groups” option From “System Tools” tree.
  • Click the “Users” option.
  • Now you will see the list of users on the right side pane, such as Administrator, Guest etc.
  • Right click the “Administrator” and select the option “Set Password” option.
  • Now you will see a warning message, Click on proceed.
  • Now the system asks you for “New Password” and “Confirm Password” .
  • After entering the password click on “OK”. The password is changed. That’s It!..
  • you have now successfully changed admin password without knowing it.
Method 3
  • Hit on start
  • Type lusrmgr.msc in the run and hit enter
  • Then click on users in left side
  • After this in the right side right click on the account which u want to hack and seleck change password
  • Enter the password u want to change
  • It will change password without asking previous
Note:You are not able to change password in guest account with this 3rd method

How to Get Email ids of your all Facebook Friends???

Get Email ids of your all Facebook Friends
If you want to know email id of your facebook friends which is hidden and not showing in your friends facebook profile so here is the trick through which you can get email addresses of your all facebook friends .
Follow Below Given Simple Steps:
  • If your facebook account is not connected with Yahoo id then first Create an email id in yahoo and connect your facebook account with yahoo Email Id .
  • Now Login to Yahoo Mail and then go to the Contacts Tab.
  • Click on Import Contatcs.
  • Now Click on Facebook
  • In Pop Up You will get Message that Do you want to Share your Contacts with Yahoo Click on OK
  • Now you will get Message
  • Thats it ! Click on View imported contacts and See you facebook friends Email Ids .

Hide/Unhide Drives without any Software

Hide/Unhide Drives without any Software
You can hide any drive in a minute and when you want to unhide, then you can do it with ease.
in this tutorial i will show you two ways of hiding , one through Command Prompt And another through Computer Management.
Follow the steps To do this:
HIDE USING COMMAND PROMPT
  • Go to Start–>Run.
  • Type Diskpart and press Enter.
  • In the console type List volume to see all the drives available on your PC.
  • Now select the drive which you want to hide.
  • Note:Here I have shown how to hide D drive.
  • In My PC it is volume 2 for drive D
  • Now to hide drive D type Select volume 2.
  • Then type remove letter d , this will hide your drive.
  • Now to get your drive back type Select volume 2 and then type assign letter d.
HIDE USING COMPUTER MANAGEMENT
  • Right click on My Computer.
  • Click Manage or press letter G.
  • This will open Computer Management.
  • Under Storage, select Disk Management.
  • Right click on the drive which you wish to hide.
  • Select Change drive letters and paths...
  • Click Remove
  • Now can find your partition will be hidden.
  • To get back the partition Computer Management–>Select drive–> Change drive letters and paths
  • Now select Add option.
  • In that Assign the following drive letter.
  • Select ok.