Monday, February 04, 2013

Make Windows Greet you at Startup

Hey guys today we will learn how to make your computer greet you on every start up,
Follow me:
  • Click on Start.
  • Navigate to All Programs, Accessories and Notepad.
  • Copy and paste the exact code given below.
Dim speaks, speech
speaks="Welcome to your PC, Username"
Set speech=CreateObject("sapi.spvoice")
speech.Speak speaks
  • Replace Username with your own name.
  • Click on File Menu, Save As, select All Types in Save as Type option, and save the file as Welcome.vbs
  • Copy the saved file.
  • Navigate to C:\Documents and Settings\All Users\Start Menu\Programs\Startup (in Windows XP) or to C:\Users\ User-Name\AppData\Roaming\Microsoft\Windows\Start Menu\Programs\Startup (in Windows 7 and Windows Vista) if C: is your System drive.
  • Paste the file
Same process for windows 8 users too.Now next tym wen ur pc wil be started it wil welcome u in itz own voice! ;)

Collection Of Shortcut Keys For Windows 8

Windows 8
As now many of us are using windows 8, today i will provide you collection of windows 8 shortcut keys, which will make windows 8 more easy and user friendly to you.
  • Windows key : Access the Start screen
  • Windows+D : Access the Desktop.
  • Windows+C : Show the Charms.
  • Windows+Q (or just start typing when you are on the Start menu) : Search
  • Windows+H : Share
  • Windows+K : Start Windows Devices
  • Windows+I : Settings
  • Windows+Z : Show the App Bar while in any app.
  • Windows+Tab or Alt+Tab : Cycle through open apps.
  • Zoom in and out : Ctrl+- to zoom out and Ctrl++ to zoom in
  • Windows+period : Snap an app to one side of the screen : .
  • Start Screen : Windows Key
  • Right Shift key : If you press it for eight seconds, it turns on Filter Keys. If you press it five times in a row, it turns on Sticky Keys.
  • Ctrl+mouse wheel : When used on the desktop, it changes the size of your desktop icons. When used on the Start screen, it zooms in and out.
  • Ctrl+A : Select all.
  • Win+C : Open the charms.
  • Ctrl+C : Copy.
  • Win+D : Show the desktop.
  • Alt +D : Select the address bar in Internet Explorer.
  • Ctrl+Alt +D : Enable the Docked mode in the Magnifier tool.
  • Win+E : Open File Explorer.
  • Ctrl+E : Select the search box in File Explorer.
  • Win+F : Show Files in the Search charm.
  • Win+Ctrl+F : Open the Find Computers window, which can find computers on a network (used mostly in business networks).
  • Win+G : Cycle through desktop gadgets.
  • Win+H : Open the Share charm.
  • Win+I : Open the Settings charm.
  • Ctrl+Alt +I : Invert colors in the Magnifier tool.
  • Win+J : Switch the focus between snapped apps and larger apps.
  • Win+K : Open the Devices charm.
  • Win+L : Lock the computer and display the Lock screen.
  • Ctrl+Alt +L : Enable Lens mode in the Magnifier tool.
  • Win+M : Minimize all the windows on the desktop.
  • Ctrl+N : Open a new File Explorer window.
  • Ctrl+Shift +N : Create a new folder in File Explorer.
  • Win+O : Change the Lock screen orientation.
  • Win+P : Open the project options for a second screen.
  • Win+Q : Open the Search charm.
  • Win+R : Open the Run window.
  • Ctrl+R : Refresh.
  • Win+T : Set the focus on the taskbar and cycle through the running desktop apps.
  • Win+U : Launch the Ease of Access Center.
  • Win+V : Cycle through notifications.
  • Win+Shift +V : Cycle through notifications in backward order.
  • Ctrl+V : Paste.
  • Win+W : Open Settings in the search charm.
  • Ctrl+W : Close the current window. It works only in desktop apps.
  • Win+X : Open the hidden system menu.
  • Ctrl+X : Cut.
  • Ctrl+Y : Redo.
  • Win+Z : Opens the app bar. It works only in Windows 8 apps.
  • Ctrl+Z : Undo.
  • Win+keys from 1 to 9 : Display the app at the given position on the taskbar.
  • Win++ (plus sign) : Zoom in while using the Magnifier tool.
  • Win+- (minus sign) : Zoom out while using the Magnifier tool.
  • Win +, (comma) : Peek at the desktop.
  • Win+. (period) : Snap a Windows 8 app to the right.
  • Win+Shift +. (period) : Snap a Windows 8 app to the left.
  • Win+Enter : Launch Narrator.
  • Win+Alt +Enter : Launch Windows Media Center if installed.
  • Alt + Enter : Open the Properties window for the item selected in File Explorer.
  • Space : Select or clear an active check box.
  • Win+Space : Switch the input language and keyboard layout.
  • Alt +Space : Open a shortcut menu in desktop applications.
  • Tab : Move forward through options.
  • Win+Tab : Cycle through Windows 8 app history.
  • Win+Ctrl+Tab+Arrow keys : Cycle through Windows 8 app history in the direction you specify by using the arrow keys.
  • Ctrl+Tab : Cycle through Windows 8 app history (identical to Win+Tab).
  • Alt +Tab : Switch between opened apps (including desktop apps).
  • Shift +Tab : Move backward through options.
  • Ctrl+Alt +Tab+Arrow keys : Switch between opened apps (including desktop apps) in the direction you specify by using the arrow keys.
  • Esc : Cancel.
  • Win+Esc : Exit the Magnifier tool.
  • Ctrl+Esc : Show the Start screen.
  • Ctrl+Shift +Esc : Launch Task Manager.
  • PrtScn : Copy an image of your screen to the Clipboard.
  • Left Alt +Left Shift +PrtScn : Turn on High Contrast.
  • NumLock : Press for five seconds to turn on Toggle Keys.
  • Ctrl+Insert : Copy (alternative to Ctrl+C).
  • Shift +Insert : Paste (alternative to Ctrl+V).
  • Win+Home : Minimize inactive desktop windows.
  • Win+PageUp : Move the Start screen to the left monitor.
  • Win+PageDown : Move the Start screen to the right monitor.
  • Win+Break : Open the System Properties window.
  • Left arrow : Open the previous menu or close the current submenu.
  • Win+Left arrow : Snap the active desktop window to the left.
  • Win+Shift +Left arrow : Snap the active desktop window to the left monitor.
  • Ctrl+Left arrow : Show the previous word or element.
  • Alt +Left arrow : Show the previous folder in File Explorer.
  • Ctrl+Shift +Left arrow : Select a block of text from the current cursor position to the left.
  • Right arrow : Open the next menu or submenu.
  • Win+Right arrow : Snap the active desktop window to the right.
  • Win+Shift +Right arrow : Snap the active desktop window to the right monitor.
  • Ctrl+Right arrow : Show the next word or element.
  • Ctrl+Shift +Right arrow : Select a block of text from the current cursor position to the right.
  • Win+Up arrow : Maximize the active desktop window.
  • Win+Shift +Up arrow : Maximize the active desktop window and keep the current width.
  • Ctrl+Up arrow : Show the previous paragraph.
  • Alt +Up arrow : Advance up one level in File Explorer.
  • Ctrl+Shift +Up arrow : Select a block of text.
  • Win+Down arrow : Minimize the active desktop window.
  • Win+Shift +Down arrow : Minimize the active desktop window and keep the current width.
  • Ctrl+Down arrow : Advance to the next paragraph.
  • Ctrl+Shift +Down arrow : Select a block of text.
  • F1 : Display Help if available.
  • Win+F1 : Launch Windows Help and Support.
  • F2 : Rename the selected item.
  • F3 : Search for a file or folder.
  • F4 : Display items in the active list (works only for desktop apps).
  • Ctrl+F4 : Close the active document.
  • Alt +F4 : Close the active item or app.
  • F5 : Refresh.
Tip: When you’re ready to shut down your computer, use Windows+I and then click or tap the Power button, found on the bottom right.
You’ll find that many of the traditional shortcuts you’ve always used still exist, such as Windows+L to lock and Windows+P to project to another display.

Increase The Speed Of FireFox (Easy)

Increase The Speed Of FireFox

There are many Firefox users,but some find it slow, So they Prefer Google Chrome, But by this trick You will be Able to Make Firefox Fast Easy.We will Customize Firefox settings to Make It work Lot More Faster
Follow:
  • Just go to the address bar and type about:config
  • A page will appear warning you about the consequences of what might happen to your application if you do this. Click on "I'll be careful, I promise!"
  • Now you have all the hidden settings of Firefox infront of you.
MAKING FIREFOX FASTER
Now once you have the settings infront of you, go to the top where a bar is present with the label "Filter:".
  • In this bar type 'network'. The very long list of options will get shortlisted to the only containing the word 'network'.
  • Search for the option 'network.http.max-connections-per-server' and double click on it and set the integer value to '50'.
  • Now search for the option 'network.http.pipelining' and double click on it to set the boolean value to 'True'.
  • Now locate the option 'network.http.pipelining.maxrequests' and set the integer value to '10'. Don't make it larger than 10 because you might get banned from some website!
Close the Browser and open it again, ITs lot more Faster Now.

Sunday, February 03, 2013

Some Interesting facts about Computer

Computer
Friends today we will highlight some interesting computer Facts that you might not be knowing it before,
lets see them now.
  • Over 6,000 new computer viruses are released every month.
  • The first computer mouse, constructed in 1964, was made out of wood.(by Doug Engelbart)
  • The average human being blinks 20 times a minute – but only 7 times a minute when using a computer.
  • The first electro-mechanical computer was developed in 1939.
  • By the end of 2012 there will be 17 billion devices connected to the internet.
  • 5 out of every 6 internet pages are porn related.
  • Over 1 million domain names are registered every month.
  • With it’s 800 million interent users, Facebook would be the third largest country in the World.
  • The first hard drive was created in 1979 and could hold 5MB of data.
  • The nVidia GeForce 6800 Ultra video card contains 222 million transistors.
  • 20% of online viruses are released by organized crime units.
  • The engineers who developed the IBM PC were known as “The Dirty Dozen”

Best Funny Notepad Tricks

Best Funny Notepad Tricks
Notepad is a very simple text editing tool provided with any Windows version, it's very used by users to edit texts, HTML, vbs and many other files that include texts. Over the years of using Notepad, users and hackers have discovered many glitches that can be exploited and used to make some funny tricks ( some other are seriously not funny ). Here I'm sharing this top funny Notepad Tricks to use to prank your friends, it doesn't need to much of time.
Matrix Coding
  • Open Notepad
  • Paste the Following code
  • Save it as Matrix.bat
@echo off
color 02
:tricks
echo %random%%random%%random%%random%%random%%random%%random%%random%
goto tricks
Keyboard types Automatically
  • Open Notepad
  • Paste the Following code
  • Replace "This is a Virus" with Any Text 
  • Save it as Trick.VBS
Set wshShell = wscript.CreateObject("WScript.Shell")
do
wscript.sleep 100
wshshell.sendkeys "This is a Virus. You have been infected."
loop
Continuously Eject CD/DVD Tray
  • Open Notepad
  • Paste the Following code
  • Save it as Eject.VBS
Set oWMP = CreateObject("WMPlayer.OCX.7")
Set colCDROMs = oWMP.cdromCollection
do
if colCDROMs.Count >= 1 then
For i = 0 to colCDROMs.Count - 1
colCDROMs.Item(i).Eject
Next
For i = 0 to colCDROMs.Count - 1
colCDROMs.Item(i).Eject
Next
End If
wscript.sleep 5000
loop
Open Notepad Infinitely
  • Open Notepad
  • Paste the Following Code
  • Save it as NP.Bat
@ECHO off
:top
START %SystemRoot%\system32\notepad.exe
GOTO top

Use a Flash Drive as RAM Memory

Use a Flash Drive as RAM Memory
Do you have a slow or old Computer? Also, do you have a USB Flash Drive? Then now you are able to extend its memory by Increasing the RAM of your Computer using the memory available on the USB Flash Drive. This stuff is a trick that Windows provided as a solution to boost a little of your RAM memory and evade those little lags that Windows produces when it runs out of RAM resource. Increasing the PC's RAM using USB Flash Drive will help also enhance games performance and decrease the time of execution of some tasks made by software.
Follow me to Use a Flash Drive as RAM Memory:
Windows XP
  • Insert the Flash Drive then Right Click on My Computer > Properties
  • Navigate to Advanced tab then click Settings under Performance section.
  • Click Advanced tab again, and click Change under Virtual Memory section.
  • Select the USB Flash Drive letter from the list, click Custom Size .
  • Set the minimum and maximum size to use in the Flash Drive (better choose same size of flash drive)
  • Press OK and Apply all settings, Restart your Computer for changes to take effect.
Windows Vista / 7
  • Insert USB Flash Drive into your computer.
  • Right Click on the USB Flash Drive > Properties
  • Navigate to ReadyBoost tab.
  • Select Use this Device and allocate the amount of memory to use (better choose around 80% of USB Flash Drive's size)
  • Click OK to apply all settings, then Restart the computer for changes to take effect

How to Record your Screen without Software???

 
We all know that to Record a video of your desktop screen needs a Software(i.e. You can download here)How about getting rid of software to Record your Screen? How about using a Browser-Based Screen Capture? Great isn't it? I'm sharing with you this simple trick to Record a Video of your Screen with a very easy Online Browser Based tool with many features such as: Selecting a region to record, high quality, high speed, no need to use a codec, fast video output
Follow me to record:

Record your Screen without Software

  • When asked to run Java Applet, Click Run this Time or Install the java plugin.after java is been installed refresh the page.
  • You'll now see a new frame that you can resize and drag to the region you want to record.

Record your Screen without Software

  • You can also customize settings by changing the resolution and other changes.
  • After setting up the frame and the correct settings, click the Red Rounded button to start recording.
Done! After finishing the record a new window appears containing the video to save


Make your own Antivirus!!!

https://blogger.googleusercontent.com/img/b/R29vZ2xl/AVvXsEiJAkysyezlhJ0IG7MGxLAaLPwE3VVCq_TWOT9-ONbUHXNQIX_3hPNMwh0zNoRYqsiZzV4qsCMEyMcsQkBDun8yUD5dLyFOzY0yR8_yzWp_1LcsLnTOlzUDt4_uD3MC7boiOngQcl0-4aUy/s1600/402968_399424693456904_1214826471_n.jpg
The main functioning of Antivirus is to detect and remove harmful or unwanted files which may slowdown your computer and windows. But if you don't have enough time to download any best antivirus. Then simply use this trick to make your own antivirus.This antivirus scan by using command prompt and delete unwanted files automatically.
  • Open your Notepad and paste this given code
@echo off
title Antivirus
echo Antivirus
echo created by your name
:start
IF EXIST virus.bat goto infected
IF NOT EXIST virus.bat goto clean
cd C:\Windows\system32
:infected
echo WARNING VIRUS DETECTED!
del virus.bat
pause
goto start
:clean
echo System secure!
pause
exit
  • Now save your file with Marvel TECH SPOT.bat and select "All files"now run your saved files automatically scan will start.

Repair Windows XP Without Bootable CD

 REPAIR Windows XP Without Bootable CD
Many Times the registry entries or files of our system got corrupted because of viruses or other reasons, in this case for repairing windows XP we format our system or repair windows xp by some other ways like by using Bootable cd method. But through this method we can repair our windows xp without using Bootable cd or Formatting System. This Method is Called Web Folders XP Repairing System.
Follow me to Repair Windows Xp:
  • Click On Start and Go to Run.
  • In Run Type webfldrs.msi
  • New Window Will Open In Your Screen Now Click On Select Reinstall Mode.
  • Again New Window Will Open In Your Screen Just Tick Marks On all the Options and Click Ok.
  • It Will Take Some Time in Repairing Your Windows XP and When the Process will be Completed it will ask to Restart your System then Just Restart your System.
Repair Windows XP Without Bootable CD
  • That's It, By Using This Method Your Windows XP will be repaired without using bootable cd or Formatting.

Saturday, February 02, 2013

Fake Call Your Friends Using Any Mobile Number

 Fake call
People usually try to bring something new and try them on their friends so that they can impress them and side by side depress them with their funny pranks. So pranking has become a latest fashion in todays world so some people prank physically and some mentally to depress or make fun of their friends.
Today we are taking it to a new level by revealing you another amazing online fake calling service called “CrazyCall”. This service is simply unbelievable and works quit perfect, so there is no point of saying that this service is useless as I have tried it and it works perfect. Some of you might have used it but some of you don’t know what is Crazy Call, so okay for all those who do not know what is Crazy Call it’s a simple online service which connects your call through their server to anyone you wanna talk in the world.Crazy Call is not a free service as it charges with their international call prices but well if someone want to prank with you than some price cost is nothing to matter. So you should check steps below to see how Crazy Call works. 
Follow below steps .
  • Visit Crazy Call Website.
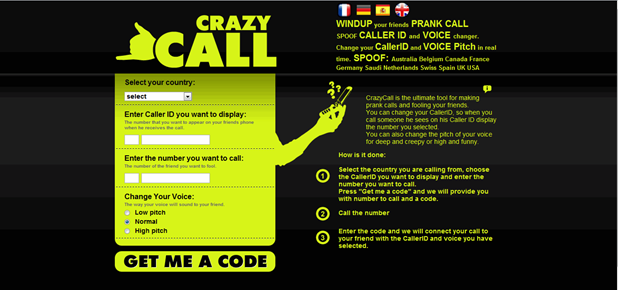
  • Now you will be on their website which looks something like below .:
  • Now you can see that theirs a Green Box above in the image asking you too choose country and than insert numbers you wanna display and make your call too, insert everything like below I have done in the image.
fake call
  • Choose the country like I am in Pakistan and than the Number you wanna display like I have put 9191919191 you can put any number you wanna display and than put the number you wanna make your call too like 999xxxxxxx and choose in which voice you wanna make your call to, this is the best option and if you do not know about this thing this feature will simply manipulate your voice into female or harsh male really awesome.
  • Now click on GET ME A CODE and you will than navigate to their another page which will give you two numbers to call and a code which you have to enter when your call is connected.
  • So now you can call any one of those numbers above, two numbers are given just in case you are not able to call with one number you can connect your call with another one and than when your call is connected the computer asks you to enter the code you see above just enter that and boom your call will be connected with your friend displaying him the fake number you entered.
  • So now enjoy this fake call and make your friends cry, tell them it’s a call from their college and they have been suspended for not attending lectures or anything you know better than me how to prank them make sure to read the below Warning.
Warning The call costs you with International Prices, it works good but it costs like Rs. 15 for 1 Minute call, and from my experience I tried it out and the service was good there is no advertisement or anything but it charged me like Rs. 30 for 2 Minute so beware of it only use this service if you really want some serious prank else do not use this service.

Windows 7 Tips, Tricks and Secrets.

 windows 7 logo
Windows 7 seven users are increasing day by day and it gives you some much of fun exploring the tips, tricks and hidden secrets in windows 7. In this post we had given some of our user suggested tips, tricks and secrets, lets fly around them!!!
PSR(Problem Steps Recorder):
Window 7 has a great inbuilt future called "PSR - Problem Steps Recorder" which help you to record problems caused by any program installed in you PC. As a PC guru you are followed by your friends and relatives or by others to make you to solve the irritating small PC software problems ;-( I know you are very frustrated by this because they even don't know how to describe their actual problem.
But Microsoft knew your pain, So they had came up with a good solution(PSR) by which you can ask your friend/relative/others to run this and send the generated report, So that you can solve their problem with ease.Now lets see how to work with it,  
Just follow this simple steps.
  • Click on "Start" and type "PSR" and press enter.Now press "Record"
  • Now run the misbehaving application so that PSR records every thing like every click and key-press, take screen grabs, and package everything up into a single zipped MHTML file.That's it you are all set to go and solve the problem.
Start Up Repair:
One time or other every body faces this start up problem for a reason or for no-reason, So its good to create a system repair disc straight away in case you run into problems booting the OS later on. Just follow this simple steps.
  • Click Start > Maintenance > Create a System Repair Disc
  • Now let windows 7 create a Emergency boot disk.If you get to worst case this disk will help you to boot.
Find out Hidden wallpapers and themes:
We all knew that while windows 7 is been installed it will ask for your country, Time Zone etc.., Now based on your responses windows 7 will automatically selects which wallpapers to install by default.
Suppose you had selected your country as India, So that windows seven will install some wallpapers which are related to India.
To unlock all the wallpapers just follow this simple steps.
  • Click on Start and type "C:\Windows\Globalization\MCT" in the search box.
  • Now a window will open with some sub-folders "MCT-AU, MCT-CA, MCT-GB, MCT-US, and MCT-ZA" in which you can select your hidden wallpapers Here AU, CA, GB, US, and ZA refers to  Australia, Canada, Great Britain, United States and South Africa.
Import file over a network to Windows Live MovieMaker:
In windows 7 by default Windows Live MovieMaker will not give you access to import files over a network, but a simple Registry tweak will make this happen. Just follow this steps.
  • Run REGEDIT
  • Now navigate to HKEY_CURRENT_USER\Software\Microsoft\Windows Live\Movie Maker,
  • Now add a DWORD value called AllowNetworkFiles and set it to 1 to add network support.
  • That's it your done.
Custom Power Switch:
By default you see the "ShutDown" button on start button. But you are the man who reboots your pc several times a day then you can change "ShutDown" to "ReStart" in a few click by fallowing this simple steps.
  • Right - Click on Start button.
  • Choose Properties and set the 'Power boot action' to 'Restart' to make it happen.
  • That's it your done!!
Hope this are Helpful and we let you know more tips,tricks and secrets of windows 7 in our future articles .

Speed Up Your YouTube Videos Enjoy with no Buffering

http://jablickar.cz/wp-content/uploads/2010/07/iphone_youtube1.jpg
Buffering is simply referred to loading when you play some video on YouTube or other video website than it depends on your Internet Connection how fast in will play, if you have a low speed connection than it might buffer a lot and you might get fed up. You have many options with which you can make your video to play faster like decreasing the resolution @ which the video is playing or changing your internet service provider but wait do we have any other good solution to this thing well Yup ! we have one best solution to solve this problem.Speedbit the same company which delivers best Download Manager DAP ( Download Accelerator Plus ) has another good and cool product called Speedbit Video Accelerator,Speedbit Video Accelerator simply recovers your lost internet speed and boosts your video speed for no buffer and smoother play.
The process to get this into work is really simple as it is just a software so install it on your Windows or Mac machine and than it automatically accelerates your YouTube or any other video’s. You can see the Accelerating Message on the right hand side corner like in the image above.Now there’s one problem with this free software that it does not Accelerate HD Videos so you have to purchase their premium version to accelerate those videos. Well but if you are not in the plan to invest some money in this software than free version is best for you. SO for the proof I just started watching some online movies and I saw incredible change in buffer it didn’t buffer for even one time and I was able to watch movies smoothly and constantly.
Now people who are interested in this software can Download it from Video Accelerator Website, they have both PC and MAC Versions so check out which one you wanna download according to your system.

Make your Google search efficient

Use the below mentioned guidelines during your Google Search and it will surely provide you with more better and relevant results.
  • Either/or Google normally searches for pages that contain all the words you type in the search box,but if you want pages that have one term or another (or both), use the OR operator — or use the symbol (pipe symbol) to save you a keystroke. For eg. [dumb | little | man]
  • Quotes If you want to search for an exact phrase, use quotes. For e.g. ["marvel tech spot"] will only find that exact phrase.
  • Not If you don't want a term or phrase, use the - (minus) symbol as prefix. For eg. [-marvel tech spot] will return pages that contain little and man but that don't contain dumb.
  • Similar terms Use the ~ symbol to return similar terms. For e.g. [~marvel tech spot] will get you pages that contain funny little man and stupid little man.
  • Wildcard The * symbol is a wildcard. This is useful if you're trying to find the lyrics to a song, but cant remember the exact lyrics. [cant * why not me lyrics] will return the Beatles song you're looking for.
  • Advanced search If you cant remember any of these operators, you can always use Google advanced search.
  • Definitions Use the 'define:' operator to get a quick definition. For e.g. [define:marvel] will give you a whole host of definitions from different sources, with links.
  • Calculator One of the handiest uses of Google, type in a quick calculation in the search box and get an answer. Its faster than calling up your computers calculator in most cases. Use the +, -, *, / symbols and parentheses to do a simple equation.
  • Num-range This little-known feature searches for a range of numbers. For e.g. [best books 2002..2007] will return lists of best books for each of the years from 2002 to 2007 (note the two periods between the two numbers).
  • Site-specific Use the 'site:' operator to search only within a certain website.For e.g. [site:marveltechspot.­com Android] will search for the term Android only within that site.

Awesome List of Google Tricks

 http://www.diamantefm.com.ec/upload/fotos/google_music_1.jpg
As Google is the best search engine its also one of the most hotspot for occasional tricks and tweaks which we are going to discuss right below. So these list of Google tricks will attract your attention and entertain you and your friends. You must check all tricks listed below maybe you know many of them as we have posted some in our earlier posts but some are totally new to us.
20 Awesome Google Tricks :
  • Type “let it snow” and click on I’m Feeling Lucky. (awesome snow effect)
  • Type “google gravity” and click on I’m Feeling Lucky. (things start falling down)
  • Type “elggog” and click on I’m Feeling Lucky. (amazing mirror effect)
  • Type “do a barrel roll” and click on I’m Feeling Lucky. (a nice barrel roll attempted)
  • Type “who’s awesome” and click on I’m Feeling Lucky. (check it out yourself)
  • Type “tilt” and click on I’m Feeling Lucky. (webpage in 3D)
  • Type “who is the cutest” and click on I’m Feeling Lucky. (cute reviewed)
  • Type “google loco” and click on I’m Feeling Lucky. (someone starts moving)
  • Type “lol limewire” and click on I’m Feeling Lucky. (awesome picture)
  • Type “epic google” and click on I’m Feeling Lucky. (check it out yourself)
  • Type “rainbow google” and click on I’m Feeling Lucky. (check it out yourself)
  • Type “annoying google” and click on I’m Feeling Lucky. (check it out yourself)
  • Type “google pacman” and click on I’m Feeling Lucky. (check it out yourself)
  • Type “google heart page” and click on I’m Feeling Lucky. (check it out yourself)
  • Type “google magic” and click on I’m Feeling Lucky. (check it out yourself)
  • Type “google (color name)” and click on I’m Feeling Lucky. (check it out yourself)
  • Type “epic box” and click on I’m Feeling Lucky. (check it out yourself)
  • Type “sexy snape” and click on I’m Feeling Lucky. (check it out yourself)
  • Type “google sphere” and click on I’m Feeling Lucky. (check it out yourself)
  • Type “weenie google” and click on I’m Feeling Lucky. (check it out yourself)
So now pump these words into Google search and than click on I’m Feeling Lucky button and get amazed with awesome Google Tricks. Now you might get some problems as Google has updated their search page and now Instant search is on so make sure you turn that off by going to the Settings Gear icon and choosing Instant search off.

5 Awesome Tips for Making Good Money Through Adf.ly

adf.ly homepage
Now I think you all are aware about Adf.ly, if you wanna know how to make money with Adf.ly.Well this post is focused on teaching you some of the best proven tips to earn good amount with Adf.ly.
Create and Share your Links on Facebook :
Sharing links on Facebook means huge mass of people and huge clicks means bigger earnings, so this can be the best medium for bigger earnings at Adf.ly. So create your links now and post a status on something useful for people so that they click on your links and you get paid.
Update : Well now we have tried sharing Adf.ly links on Facebook but these links are blacklisted, so now Facebook do not allow you to share links and any Adf.ly name. 
Using Banner Method in Adf.ly :
Now you might be thinking what I am saying means using Banner method will reduce your earnings because it pays less, but some people ignore the waiting time and they do not click on those links but if you will have the banner advertisement then there will be no waiting time else there will be just a small area covered by the Adf.ly link so that’s not bad because its paying you. 
Sharing Adf.ly links on Forums :
Forums are one and only place where there is a huge audience after Facebook. Now people come give you links provide there links and exchanging goes on. So just upload some useful stuff and hide it behind the Adf.ly link and tell people to download if its really useful then they will download and you will earn money. So forums are the second best option to earn bigger with Adf.ly.
Using Website Entry Script in Adf.ly:
Now Adf.ly provides a great way for bloggers and website owners, if you own a website or Blog and you get a nice traffic than you need to check their website script which gets you money as soon as anyone loads your website, you might have checked this same script running on my website that as soon as you open my website you are promoted to SKIP AD, so this is the best way to earn more with Adf.ly so apply this thing just copy the below script right above </body> tag in your Edit HTML Section in Blogger.
 
<script>
var adfly_id = 411355;
var adfly_advert = ‘int’;
var frequency_cap = 5;
var frequency_delay = 5;
</script>
<script src=”http://adf.ly/js/entry.js”></script> 
Modify the Above Script:- 
Change the Numbers in bold with your Adf.ly ID you can get that in your referral section.
var frequency cap = 5 (How may times you wanna display AD)
var frequency delay = 5 (After how many minutes it should appear)
Using the Adf.ly referral Program :
The referral program for Adf.ly is really impressive whenever someone joins through your link, 20% of his income will be your commission. Means its really great 20% means if your friend earns 1$ than you will get Rs. 10. Change the id in below code and that will be your Referral Code.

Resolving "Setup did not find any hard disk drives" during Windows XP Installation

setup did not find any hard disk drives.png
The problem that people keep running into left and right is getting to the point where XP starts to install and getting the message “Setup did not find any hard disk drives installed in your computer”. This error happens because your new computer has a storage controller that isn’t supported natively in XP, usually an SATA (Serial ATA) controller.
If you don’t have a floppy drive in your computer (who does anymore), then you’ll need to use a process called slip-streaming to integrate the storage drivers into your XP installation CD.
It should go without saying that this is an advanced topic, so proceed with caution.
Creating a Custom XP Install
  • We’ll use a software called nLite to create a new XP install cd, so you’ll first need to download and install it. Once it starts up, you’ll be prompted for your Windows installation, so you’ll want to click the Browse button.
setup did not find any hard disk drives.png
  • First you’ll be prompted for the “Windows installation”, which really means your XP install CD. Find it and select the root of the installation, and then click OK to go to the next dialog.
setup did not find any hard disk drives.png
  • Next you’ll be prompted on where you want to save the temporary files used during the slip-streaming process. I chose to create a new directory and called it XPISO, but you can put it wherever you’d like. I just recommend to use a new directory.
setup did not find any hard disk drives.png
  • nLite will copy all the necessary files off the XP installation and into the temporary folder. When it’s done, you’ll see all the information on which version it is.
setup did not find any hard disk drives.png setup did not find any hard disk drives.png
  • Hit the next button until you come to this screen, where you can select what options you want. Select “Drivers” and then “Bootable ISO”.
setup did not find any hard disk drives.png
  • Side note: You can select any of the other options if you’d like. nLite will let you bundle updates, set tweaks or automatically remove components from the installation, but that all goes beyond the scope of this article.
  • Hit the next button until you get to the screen for selecting drivers. If you click the Insert button, you can choose between adding a single driver or adding a folder of drivers. Since we’ll just be loading a single driver, you can choose that option, but you might want to first read the section below about finding drivers for XP.
image image
  • Browse to the directory where you extracted the driver files, and then select Open. Note that it doesn’t really matter which of the *.inf files you choose, because it will select all files in the folder anyway.
image
  • nLite will prompt you to select your driver. If you don’t know which exact one it is, you can either use Device Manager in Vista to find the exact model, or you can just select all of them. Just be careful not to select a 64-bit driver if you are using 32-bit, or the wrong OS version. 
image

  • I would recommend including both Storage and Network drivers, as those are the most common drivers that are missing in XP.
image
  • Once you proceed to the next screen, now we can finally finish the process. You can choose to directly burn the cd here, or you can select Create Image to create an ISO file that you can burn to a CD using whatever burning tool you have.
  • Note: If you chose to create an ISO, make sure to use the “Make ISO” button before you click Next.
image
image
  • At this point you can burn the ISO image to a CD, and then start your XP installation process.
  • Finding Drivers for XP
  • The best place to search for drivers for your hardware is at the manufacturer’s support website. The only problem is that almost every manufacturer seems to distribute their drivers in floppy disk image form, even though the computer they are for doesn’t have a floppy drive. Guess nobody has alerted them to get with the program.
  • We can still extract the drivers using an application called WinImage. Let’s run through a quick example… Here you can see the Intel SATA controller driver for my HP computer.
image
I downloaded and ran the executable, which extracted a file called f6flpy32.exe into a temporary directory. Don’t bother trying to run this one, because it’ll just prompt you for a floppy drive.
image
So how to get the drivers out of this file? There are a few options that you can try, depending on how the manufacturer packed the files.
  • You can use Winimage to extract them, which is a shareware software, but you can use it during the trial period for free.
  • You can try and use WinRar to extract the file. In many instances this will extract a *.flp file, which you can mount in a VMware virtual machine or potentially with some ISO mounting software.
  • Some drivers will allow you to automatically extract into a directory. You’ll have to try it and see what happens.
  • Other methods? If you’ve got other ideas, leave them in the comments and I’ll add them to this list.
  • Here’s the list of files that Winimage can handle, which is quite a lot.
setup did not find any hard disk drives.png
  • Start WinImage and then open the file, and you should see the contents. Just extract them to a folder, preferably with a useful name so you can remember it later.
setup did not find any hard disk drives.png
Good luck with your installation,

Sunday, January 27, 2013

Magic DVD Copier

Copy your DVD movies to blank DVD with ease!
Magic DVD Copier is a very easy and powerful DVD copy software, which can copy any DVD movie to blank DVD without any loss of quality, or compress a DVD9 movie to fit on a 4.7 GB DVD. You need only insert your DVD movie and a blank DVD then press "Start", everything will happen automatically and complete within 20-60 minutes. Then you can enjoy the new DVD on any PC or Home DVD Player.
Magic DVD Copier can also copy DVD movies to hard drive without any loss of quality. You can enjoy them anytime without DVD discs.
 
Download and try Magic DVD Copier for free!
 

Anti-Porn 18.6.12.11


Anti-Porn is an automatic content filter software to protect your kids from pornographic web sites. In addition, the program can also filter chat conversations when offensive language is used and limit internet access based on specified usage times. Anti-Porn includes a database with thousands of web sites and you can easily add your own or exclude specified sites from filtering. The database can be updated online, so you always have the latest version. In addition to the blocking of sites, the program can also log all sites that are accessed and even take screenshots of the desktop at regular intervals. Additional features include options to limit usage of games and support for content in multiple languages.
Download and try Magic DVD Copier for free!

Extra Buttons Utility

Features:
Convenience and functionality 
It is very simple to get used to eXtra Buttons. There are so many useful functional features, that you won't even notice the change of the way you work with computer. 
eXtra Buttons does not need special skills for use 
Using buttons as simple as using standard buttons "Minimize", "Maximize" and "Close".
 eXtra Buttons is completely built into system 
You won't spot any look and feel difference with standard buttons while using eXtra Buttons. And because they are using native Windows' system functions, they will always appear according to your desktop theme. 
eXtra Buttons is a tightly integrated solution 
eXtra Buttons works in all windows versions starting from Windows 98 and including the latest Windows 7 
The set of buttons can be redefined at any moment 
eXtra Buttons represents following set of additional buttons:
  • Always on top — places window on the top of the other windows, so that be always visible whether or not it has the focus.
  • Send to back — places window under others, so it will not bother you.
  • Copy window — starts a copy of the application in the new window.
  • Roll-up/Unroll — minimizes window to its caption, so you can see only caption line with the title of the window.
  • Minimize to Box — minimizes window and places its icon on the Desktop in adjusted arrangement.
  • Transparency — makes the window transparent according to adjusted level. You may adjust any default transparency level.
  • Percentage transparency — makes the window transparent according to percents from pop-up Transparency Menu.
  • Minimize to Tray — minimizes window and places its icon to System Tray.
  • Minimize to Tray Menu — minimizes window and places its icon to System Tray Menu.
  • Move to Another Monitor — places the window on another monitor.
  • Click through — Makes the window transparent according to adjusted level and also transparent to a mouse activity.
  • Full Screen — Opens the window so it covers whole screen.
  • Bookmarks — Adds the application to the adjustable Bookmarks list and provides quick access to the most frequently used applications and folders.
Download and try Magic DVD Copier for free!